Friday, December 6, 2013

Text Tutorial RAINBOW

Alayne Felix
            RAINBOW
Step 1- Choose a new (width=7in x height=5in) RGB document.

Step 2- Click the Horizontal Type Tool and use the following settings:
Font- LilyUPC /BoldFont Size- 270 pt


Step 3- Type out the word TEXT, in a red foreground color, and visually center it by using the move tool.


Step 4-Flatten your image by clicking CTRL E. Select the magic wand tool (make sure the “add selection” box is highlighted, and select all letters.)


Step 5- Click SELECT-MODIFY-EXPAND


Step 6- Expand your text 4 pixels.


Step 7- Making sure your foreground color is still red, fill your selection by clicking ALT BACKSPACE.
Your new image should look like this:

Step 8- Click SELECT-MODIFY-CONTRACT


Step 9- Contract your image by 3 pixels


Step 10- Fill your selection with orange by selecting the color ORANGE and clicking ALT BASCKSPACE.
Your new image should look like this:


Step 11- Repeat step 9 and fill your selection with YELLOW.
Your new image should look like this:


Step 12- Repeat step 9 and fill your selection with GREEN.
Your new image should look like this:


Step 13- Repeat step 9 and fill your selection with BLUE.
Your new image should look like this:


Step 14- Repeat step 9 and fill your selection with INDIGO.
Your new image should look like this:


Step 15- Repeat step 9 and fill your selection with VIOLET.
Your new image should look like this:


Step 16- DESELECT YOUR IMAGE by clicking CTRL D.


Step 17-FILTER-SHARPEN-SHARPEN


Now you have RAINBOW!!!!!


Wednesday, November 20, 2013

Monday, November 18, 2013

Cutout


We used a series of effects to create a cutout of the word sunset in a picture of a sunset.

Techno Dot

We used a series of effects to create techno dots.

Thursday, November 14, 2013

Grungy

We used a series of filter effects to create a grungy 3D image.

Alien

We used a series of filter effects to create an Alien effect that is 3D.

Chalk

We used a series of effects to create the 3D text of CHALK.

Tuesday, November 12, 2013

Friday, November 8, 2013

Runny Text (Norm.)

We used a series of filter effects to create the "runny" effect.

3D Runny Text

We used a series of filter effects to create the 3D Runny Text.

Thursday, November 7, 2013

Four way fire text


We used a series of filter effects to create a four way fire text.

Fire!

We used a series of filter effects to create the effect of fire.

Gold Letter

We used a series of filter effects to create gold.

Ice

We used a series of filter effects to create the effect of ice.

Slime


We used a series of filter effects to create slime.

Chrome


We used a series of filter effects to create a chrome text.

Marble letter

We used a series of filter effects to create a marble letter.

Monday, November 4, 2013

Gun label

We used a series of filter effects to create a gun label text.

Tuesday, October 8, 2013

Light Saber


We used a variety of different filter effects to create light sabers.

Monday, October 7, 2013

Blobs


We used a series of different filter effects to create a bunch of blobs.

Diamonds

We used a variety of effects to create a bunch of diamonds. 

Thursday, October 3, 2013

Wood

We used many different filter effects to create the texture of wood.

Marble

We used different filter effects to create a simple marble texture.

Wednesday, October 2, 2013

Pop Art Project

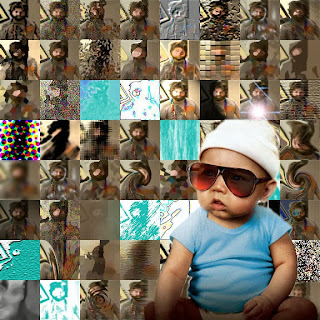
Zach Galifianakis & the baby he found in the police car from The Hangover Part 1. In this project I put a different filter effect on each of my 64 pictures of Zach. I then used the baby which is a compliment of Zach to pop out on the picture.

Monday, September 23, 2013

My First Blog

So, why a blog?
We have the best computer graphics program & we can go lengths with the technology we were given.